Skip to content
ISEAGE Cyber Defense Challenges

Recent News

Installing Identity Management for Unix on a Domain Controller

Identity Management for Unix allows you do to things like authenticate against Active Directory from a *nix system using LDAP or other tools. Refer to this technet article for full instructions on installing the components; the synopsis is below. Afterwards you will need to set up some user and group attributes.

WARNING: It appears that Identity Management for UNIX has been removed in Server 2012 R2. While there are workarounds, they involve editing your Active Directory schema directly (which is dangerous) and are beyond the scope of this article.

In Server 2008/R2 do the following:

To install Identity Management for UNIX components

  1. Open Server Manager. To open Server Manager, click Start , point to Administrative Tools , and then click Server Manager .
  2. In the tree pane, expand Roles .
  3. On the role home page for AD DS, in the Roles section, in the list of common tasks, click Add Role Services .
  4. On the Select Role Services page of the Add Role Services Wizard, select the Identity Management for UNIX role services that you want to install, and then click Next .
  5. If the wizard prompts you to install any other role services that are required by Identity Management for UNIX components, click Yes .
  6. After verifying your selections on the Confirm Installation Selections page, click Install .The computer must be restarted after the installation of Identity Management for UNIX finishes.

In Server 2012 do the following:

Right-click Windows PowerShell and click Run as Administrator. Run each of the following commands:

  • Dism.exe /online /enable-feature /featurename:adminui /all to install the administration tools for Identity Management for UNIX.
  • Dism.exe /online /enable-feature /featurename:nis /all to install Server for NIS
  • Dism.exe /online /enable-feature /featurename:psync /all to install Password Synchronization

A restart of the computer is required when you install Identity Management for UNIX.

Once you’ve done that, we’ll need to do some additional configuration. Open up Active Directory Users and Computers. Make a standard group for your *nix administrators. Then right-click the group and choose the UNIX Attributes tab:
2014-02-27_0139

Additionally, you’ll need to edit the properties of any user you plan on giving access to a *nix box. Open up Active Directory Users and Computers and right-click a user account, then select the UNIX Attributes tab:
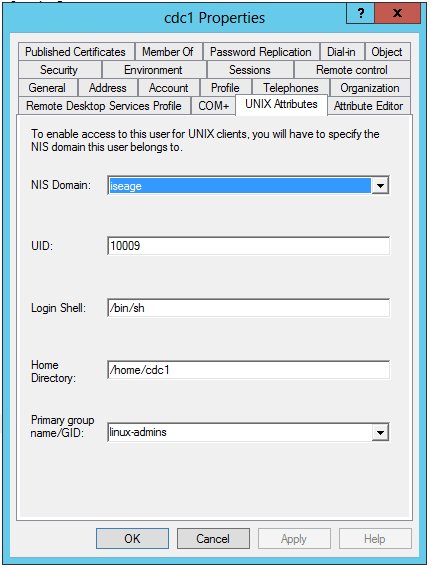
2014-02-27_0133

Use the primary group you made earlier.

One last thing: You’ll need to make a standard user in Active Directory for your *nix systems to bind with in order to perform LDAP queries. This user doesn’t have to have any special permissions but it’s a good idea to check the “user can never change password” box when creating it.

2014 National CDC in the news!

Hey everyone,

We made the news! The local TV stations picked us up:
13 (WHO): http://whotv.com/2014/02/09/cyber-defense-competition-teaches-internet-data-security/
8 (KCCI): http://www.kcci.com/news/central-iowa/iowa-state-hosts-national-cyber-defense-competition/24372266

So did the newspapers:
Ames Tribune: http://amestrib.com/news/isu-s-cyber-defense-competition-provides-real-life-experience
Iowa State Daily: http://www.iowastatedaily.com/news/article_4e9dde66-9135-11e3-b825-001a4bcf887a.html

C3DC13 Images Now Available!

The two provided images are now available for download. Keep in mind these images have vulnerabilities and should not be run in sensitive environments!

C3DC13-Web | C3DC13-Shell

These files are also mirrored here.

The VMs can be run using the free VMware Player or the non-free VMware Workstation, which may be provided by your academic institution. If you’d like to run these on a local ESXi server instead, grab VMware vCenter Converter Standalone to convert them to the correct format. (You’ll need to register a free account with VMware to download ESXi and vCenter Converter).

2013 ISU CDC images now available!

The four provided images are now available for download. Keep in mind these images have vulnerabilities and should not be run in sensitive environments!

ISUCDC13-Web | ISUCDC13-Shell | ISUCDC13-AD-LDAP | ISUCDC13-pfSense

These files are also mirrored here.

The VMs can be run using the free VMware Player or the non-free VMware Workstation, which may be provided by your academic institution. If you’d like to run these on a local ESXi server instead, grab VMware vCenter Converter Standalone to convert them to the correct format. (You’ll need to register a free account with VMware to download ESXi and vCenter Converter).

Fall ISU CDC 2013 Shell Server Git Repository and Flag

There was an error when setting up the git repository on the shell server.  It is empty.  We need to put the correct code there as well as commit and push the flag that belongs in the repository.

Follow these instructions.  Note the first block must happen on the shell server, the second block can happen on any machine that can access the shell server (including your laptop if it is running a flavor linux/unix and has git):

# ON THE SHELL SERVER, DO THIS:
export HTTPS_PROXY="http://199.100.16.100:3128"
git clone https://github.com/benjholla/Blackbook.git
cd Blackbook
cp -r .git/ /home/git/webapp.git
cd /home/git/webapp.git
git update-server-info
git --git-dir=/home/git/webapp.git config core.bare true

Note: “path/to/flag_file.flag” is a placeholder for wherever your flag file is currently on the file system.

# ON ANY CLIENT MACHINE THAT CAN ACCESS THE SHELL SERVER
git clone git@shell.teamN.isucdc.com:/home/git/webapp.git
cd webapp
mv /path/to/flag_file.flag .
git add flag_file.flag
git commit -m "Adding flag"
git push origin

Note: The author of the shell box would like to point out that this was not his mistake.