Download them in Powerpoint or PDF form.
Recent News
Connecting to the ISEAGE VPN
ISEAGE now supplies a VPN to connect your machine directly into the management range. This will allow your machine to access everything on the competition range.
Viscosity is a fantastic VPN client for all platforms, however it is not free. If you would like to use Viscosity, you can import this connection file. It should work out of the box with that connection file.
OpenVPN Connect is another decent VPN client. Simply install the client, download this connection configuration file, and double click it to open it with the OpenVPN client. You will also need the CA certificate file linked below. Extract it into the same directory as the configuration file.
If you don’t want to use either of those clients, you can use another openVPN client of your choice. Here are the configuration options you will need:
CA certificate file: download here.
route-gateway dhcp
remote vpn.iseage.org 1194 udp
persist-key
auth-user-pass
tls-client
pull
ca iseage-ca.crt
redirect-gateway def1
dev tun
persist-tun
nobind
dhcp-option DNS 199.100.16.100
After configuring your client, connect to the VPN. It will prompt you for a username and password. Use the same credentials as you use to connect to IScorE/RDP/vCenter. Do not include the “ISEAGE\” part before your username.
LDAP Check Fixed
Hello participants – a quick note!
The LDAP check was broken because it was still using the old domain scheme for its queries (siteN.cdc.com instead of teamN.isucdc.com). The problem has been fixed and now some Active Directory servers are scanning as up!
Getting Windows Server 2012 working behind the proxy
After setting the proxy in internet options, you’ll have to run an additional command to get Windows Update working.
Open a command prompt and run the following:
netsh winhttp import proxy source=ie
You can verify this by running:
netsh winhttp show proxy
And if you want to reset it:
netsh winhttp reset proxy
Installing VMware Tools
VMware Tools is a package that can be installed on your Windows and Linux/BSD VMs that improves their performance, especially in graphics and networking.
Installation in Windows guests
Select the VM, and on the “Summary” tab you will see an option to install VMware Tools:
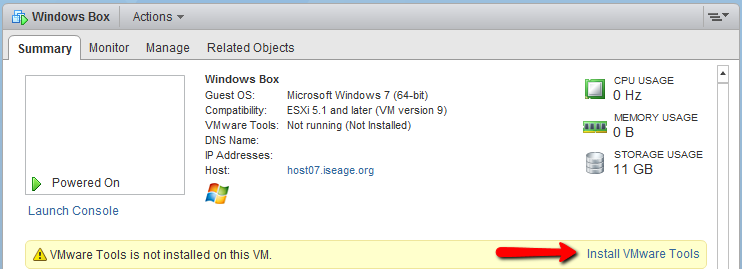
This will mount the CD image for you.
In the guest, simply open up the CD drive and run the setup executable.
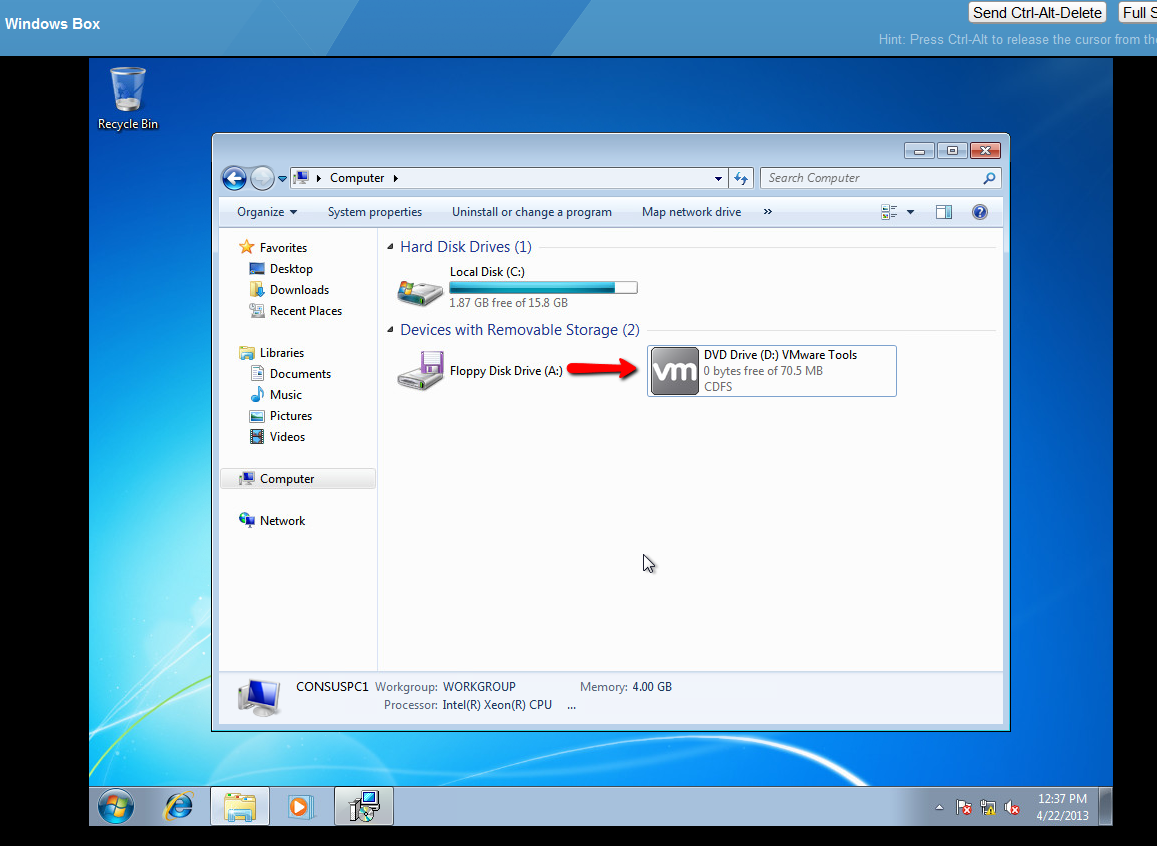
Generally, it’s safe to accept the default options. You’ll need to reboot once the installation is finished.
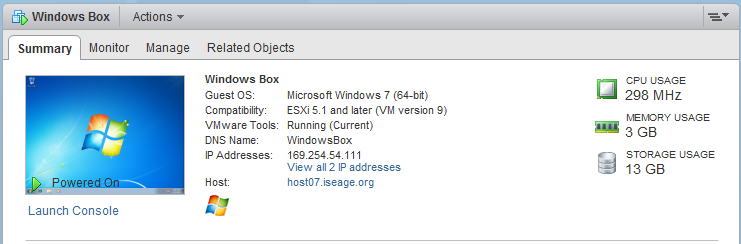
You’ll notice that the IP address of the VM now becomes visible in the Web Client, as well as some information about its resource usage:
Installation in Linux/BSD guests
Via the open-vm-tools package
VMware recommends you install the open-vm-tools package provided by your distribution, if it exists.
- Debian/Ubuntu:
-
apt-get install open-vm-tools
- Fedora/CentOS:
-
yum install open-vm-tools
- openSUSE:
-
zypper install open-vm-tools
- BSD:
-
pkg install open-vm-tools-nox11 (for systems without a GUI)

-- or --

pkg install open-vm-tools (for systems with a GUI)
Manually from CD
Mount the CD by clicking “Install VMware Tools” as in the installation for Windows guests. You’ll probably need to install some packages to satisfy VMware Tools’ dependencies.
At minimum you will need:
- Perl (installed by default on many systems)
- Debian/Ubuntu (usually already installed):
apt-get install perl
- Fedora/CentOS (usually already installed):
yum install perl
- openSUSE (usually already installed):
zypper install perl
- BSD:
pkg_add -r perl5
- Debian/Ubuntu (usually already installed):
- C compiler and appropriate header files
- Debian/Ubuntu:
apt-get install build-essential
- Fedora/CentOS:
yum groupinstall "Development Tools"
- openSUSE:
zypper install -t pattern devel_C_C++
- Debian/Ubuntu:
- Kernel header files
- Debian:
apt-get install linux-headers-$(uname -r)
- openSUSE:
zypper install kernel-devel
- Debian:
- In FreeBSD guests, you will also need the “compat6x” package:
pkg_add -r compat6x-i386 (32-bit)

--or--

pkg_add -r compat6x-amd64 (64-bit)
Now mount the CD drive. If your *nix installation has a GUI, this should be done automatically for you. Otherwise, run the following as root:
- Linux:
mount /dev/cdrom /mnt
- BSD:
mount -t cd9660 /dev/cd0 /mnt
Now copy the file to a temporary location, extract it, and run it:
cp /mnt/VMware-Tools*.tar.gz /tmp/
cd /tmp
tar -zxf VMware-Tools*.tar.gz
cd vmware-tools-distrib/
./vmware-install.pl
The installer will ask you a series of questions; accept the default options if you aren’t sure.
Once the installer is done, reboot.