Installing VMware Tools

VMware Tools is a package that can be installed on your Windows and Linux/BSD VMs that improves their performance, especially in graphics and networking.

Installation in Windows guests

Select the VM, and on the “Summary” tab you will see an option to install VMware Tools:

tools

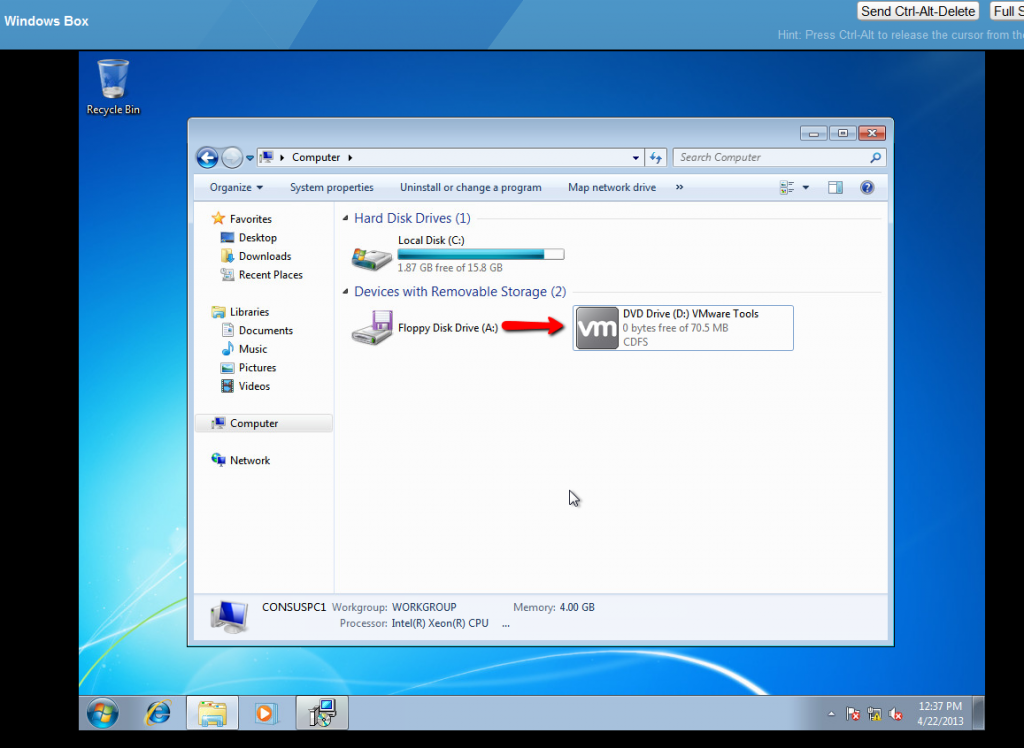
This will mount the CD image for you.

In the guest,  simply open up the CD drive and run the setup executable.

tools1

Generally, it’s safe to accept the default options. You’ll need to reboot once the installation is finished.

You’ll notice that the IP address of the VM now becomes visible in the Web Client, as well as some information about its resource usage:

tools2

Installation in Linux/BSD guests

Via the open-vm-tools package

VMware recommends you install the open-vm-tools package provided by your distribution, if it exists.

  •  Debian/Ubuntu:
  • apt-get install open-vm-tools
  • Fedora/CentOS:
  • yum install open-vm-tools
  • openSUSE:
  • zypper install open-vm-tools
  • BSD:
  • pkg install open-vm-tools-nox11 (for systems without a GUI)
    
    -- or --
    
    pkg install open-vm-tools (for systems with a GUI)

Manually from CD

Mount the CD by clicking “Install VMware Tools” as in the installation for Windows guests. You’ll probably need to install some packages to satisfy VMware Tools’ dependencies.

At minimum you will need:

  • Perl (installed by default on many systems)
    • Debian/Ubuntu (usually already installed):
      apt-get install perl
    • Fedora/CentOS (usually already installed):
      yum install perl
    • openSUSE (usually already installed):
      zypper install perl
    • BSD:
      pkg_add -r perl5
  • C compiler and appropriate header files
    • Debian/Ubuntu:
      apt-get install build-essential
    • Fedora/CentOS:
      yum groupinstall "Development Tools"
    • openSUSE:
      zypper install -t pattern devel_C_C++
  • Kernel header files
    • Debian:
      apt-get install linux-headers-$(uname -r)
    • openSUSE:
      zypper install kernel-devel
  • In FreeBSD guests, you will also need the “compat6x” package:
    pkg_add -r compat6x-i386 (32-bit)
    
    --or--
    
    pkg_add -r compat6x-amd64 (64-bit)
    

Now mount the CD drive. If your *nix installation has a GUI, this should be done automatically for you. Otherwise, run the following as root:

  • Linux:
    mount /dev/cdrom /mnt
  • BSD:
    mount -t cd9660 /dev/cd0 /mnt

Now copy the file to a temporary location, extract it, and run it:

cp /mnt/VMware-Tools*.tar.gz /tmp/
cd /tmp
tar -zxf VMware-Tools*.tar.gz
cd vmware-tools-distrib/
./vmware-install.pl

The installer will ask you a series of questions; accept the default options if you aren’t sure.
Once the installer is done, reboot.

ITOCDC13: Shell Server and the Service Scanner

Some of you may have noticed this error on IScorE:

ssherror

IScorE’s scanner is only compatible with SSH version 2. In order to remedy this you’ll need to edit your SSH config file (most likely /etc/ssh/sshd_config). Make sure the Protocol directive is set to 2 and the HostKey lines are uncommented (comments begin with a # symbol), as shown below:

sshd

Afterwards, restart the SSH daemon by issuing “service ssh restart” as root. (Note: this command may vary by platform. If nothing else, rebooting the server will apply the changes).

Tutorial: Connect to Support Chat with Adium for Mac OS X

Here is a quick guide for connecting to the support chat server with Adium, a multi-chat client for Mac OS X.

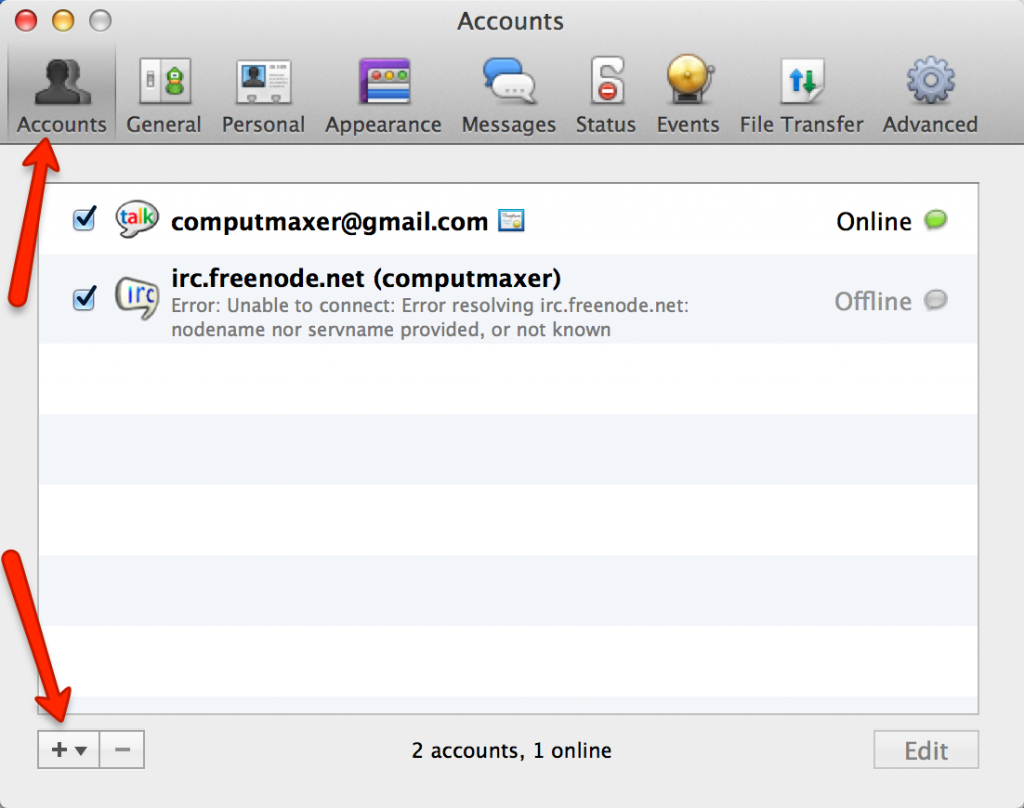
First, launch Adium and go to Preferences –> Accounts.  Click the ‘+’ to add an account.  Choose ‘XMPP’ for account type.

adium1

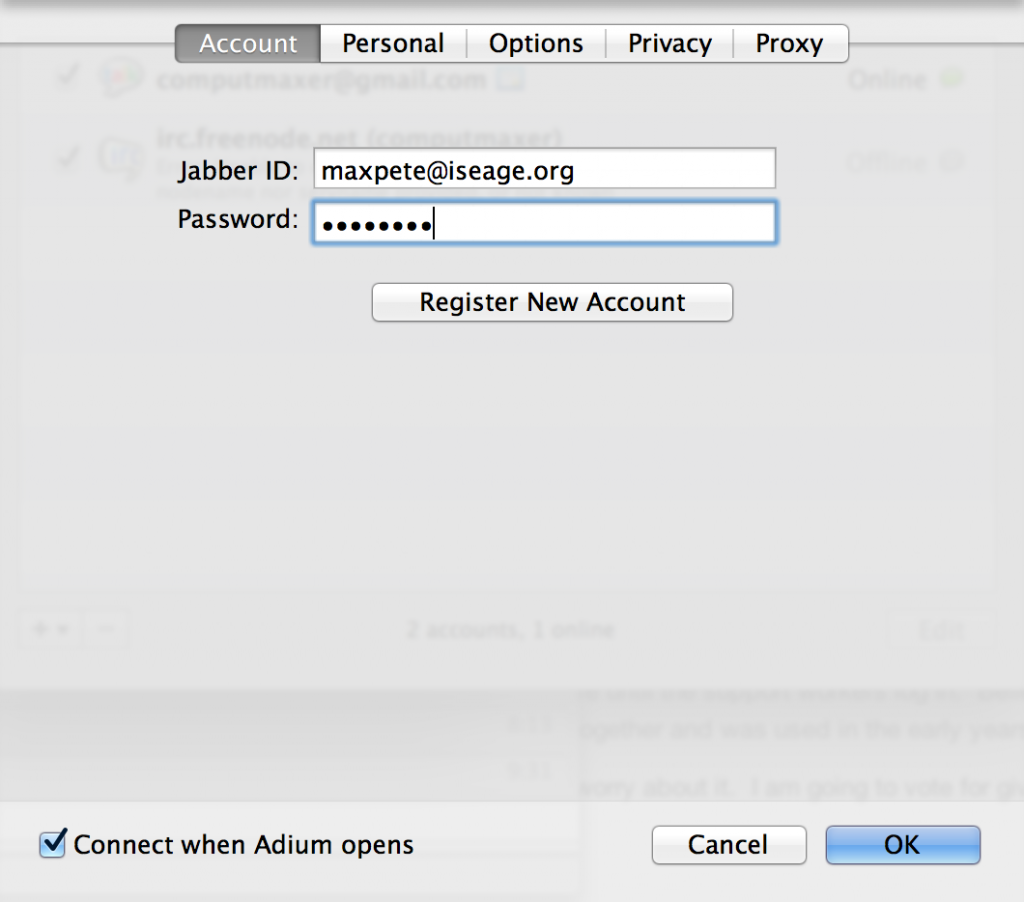
Enter your account name.  This will be <your_username>@iseage.org:

adium2

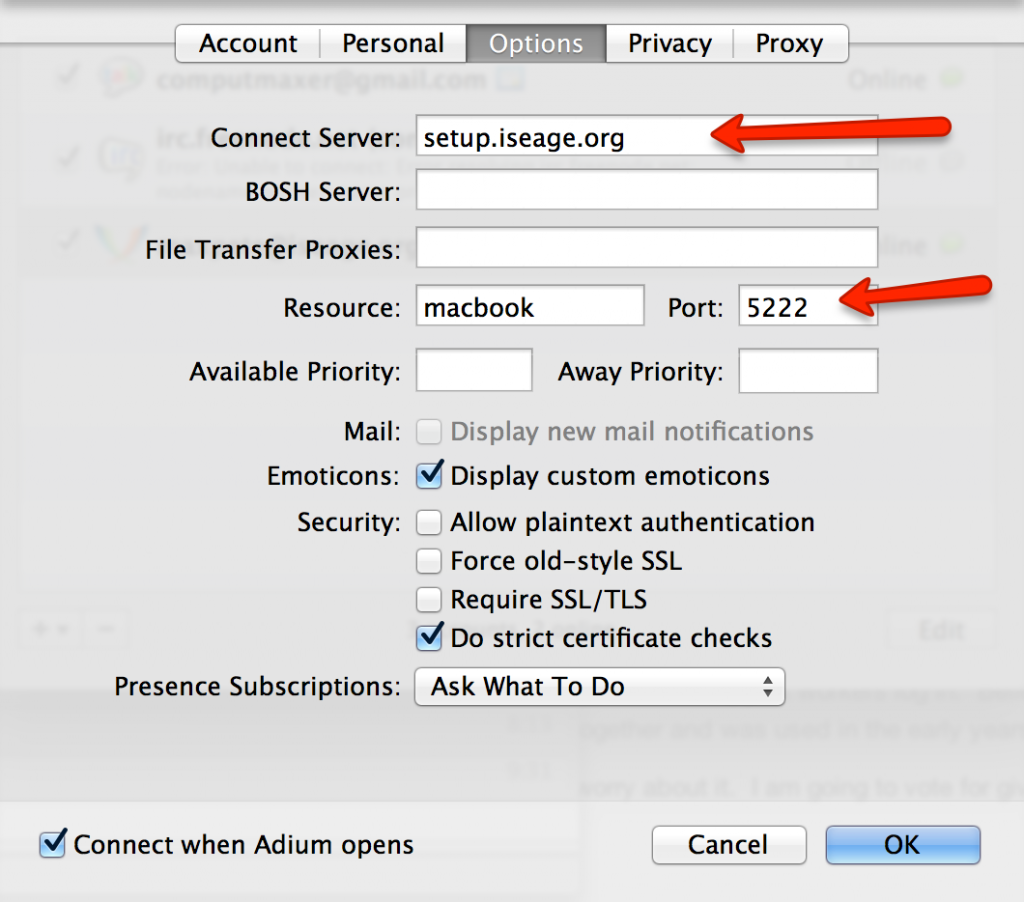
Next click the ‘Options’ tab and enter the server and port as seen below.  Server should be “setup.iseage.org” and port should be 5222:

adium3

You may now click ‘OK’ to add the new account.

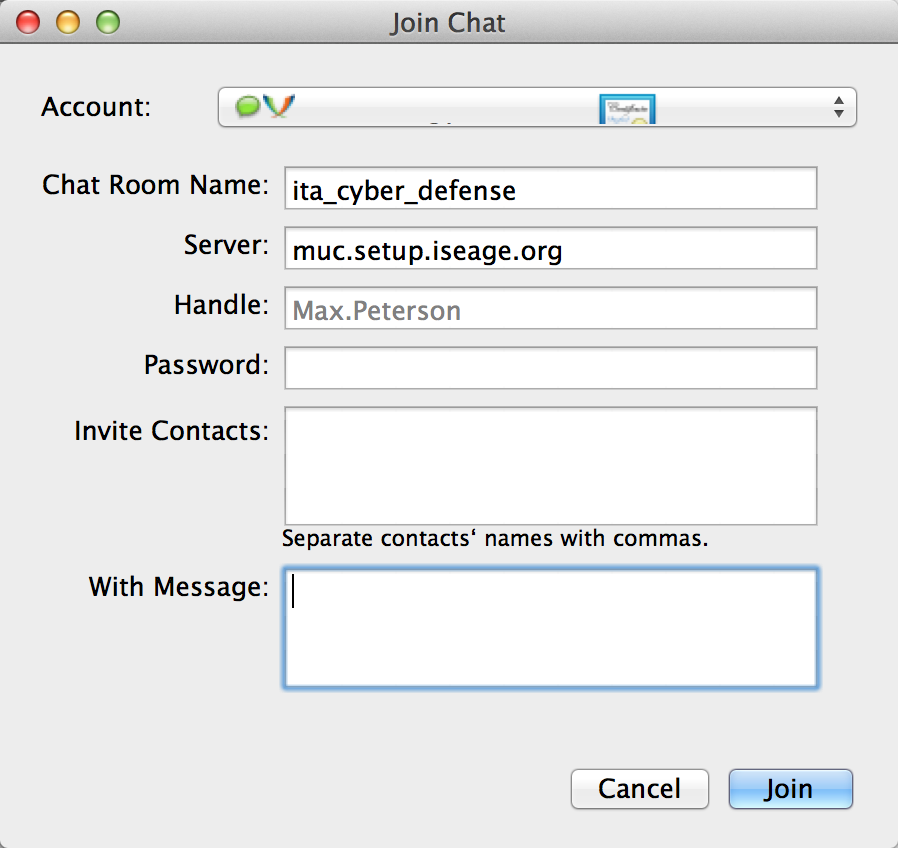
Now you are ready to join a chatroom.  Go to File –> Join Group Chat… Choose the account you just created from the account dropdown list if it isn’t already selected.
Type in the chatroom name such as ‘supportchat’ or ‘ita_cyber_defense’.  The server must be set to “muc.setup.iseage.org”.  Handle will be your nickname upon joining.

adium4

Repeat the last step for every chat room you want to join.

Congratulations! You’re finished!

Tutorial: Connect to Support Chat with Mac OS X Messages

Here is a quick guide for connecting to the support chat server with Mac OS X Messages application.

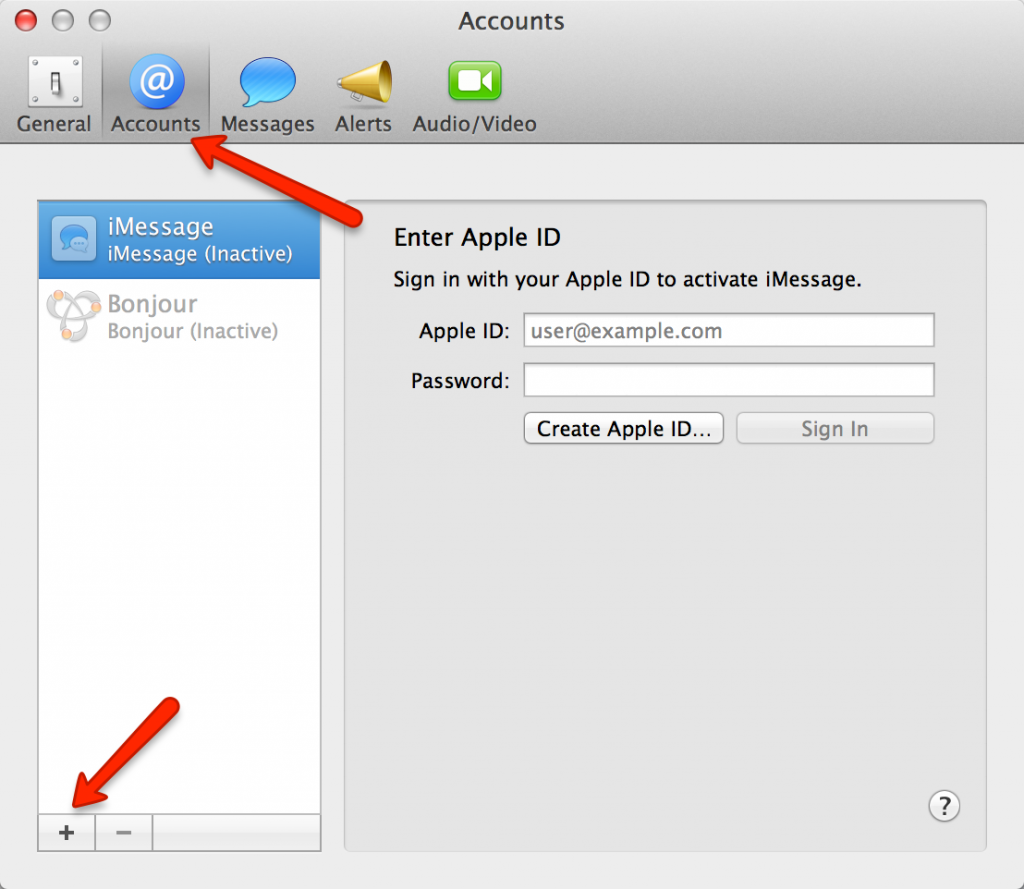
First, launch messages and go to Preferences –> Accounts.  Click the ‘+’ to add an account.

messages1


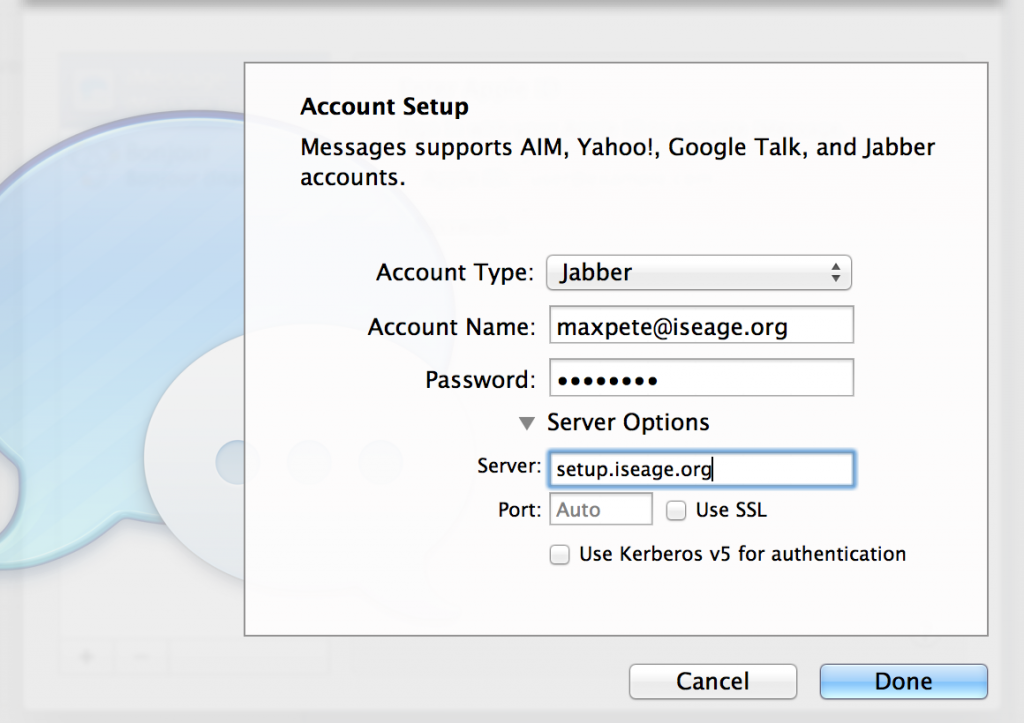
The account name should be <your_username>@iseage.org as shown in the following screenshot.  The server should be “setup.iseage.org”:

messages2


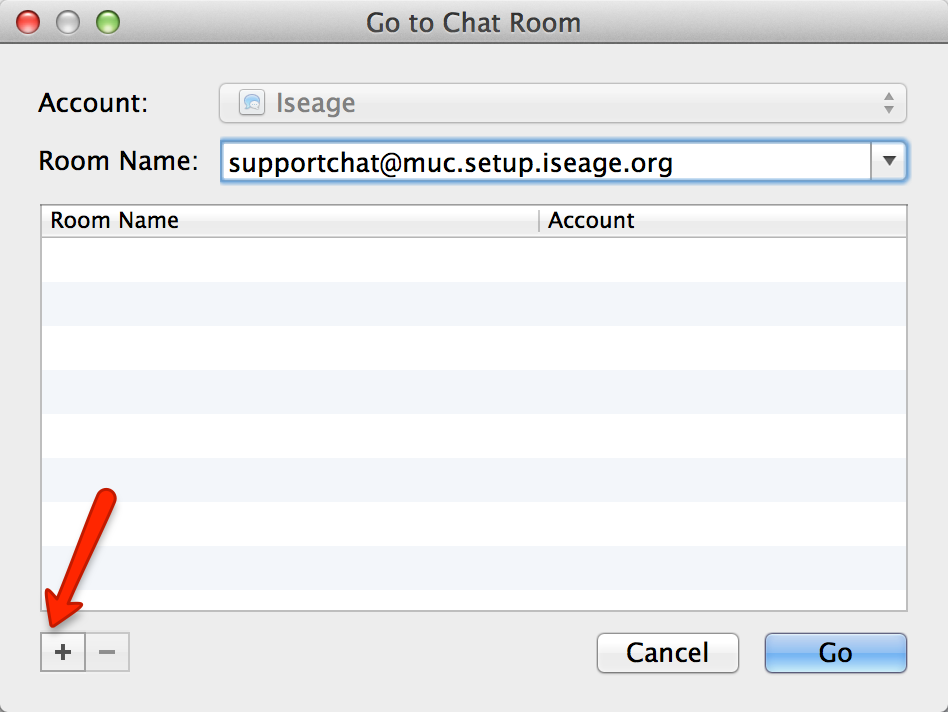
Next, do File –> Go To Chatroom… or use the keyboard shortcut COMMAND-R to join a chatroom.  The room name will be “<name_of_chatroom>@muc.setup.iseage.org”:

messages3

Repeat the last step for every chat room you want to join.

Congratulations! You’re finished!

Introducing the vSphere Web Client

Some teams have been experiencing some issues with editing the settings of your VMs. We’ve been trying to nail down the root cause, but in the mean time we’ve come up with an alternate solution: introducing you to the vSphere Web Client.

webclient

So far you’ve been using the desktop-based VMware vSphere Client to log in to vCenter. There is another method for access: the vSphere Web Client, the icon for which you can find on the desktop of the RDP hop. The Web Client is new to ISEAGE this year, and will eventually become the main method of accessing vCenter as the original vSphere Client is slowly deprecated. More importantly for our purposes, it has far fewer issues with permissions.

As with the vSphere Client, you can check the box to automatically use your CDC credentials, and you’ll need to ignore the certificate error. The Web Client also has some new features not found in the old vSphere Client, so we encourage you to familiarize yourself with it; when you arrive on-site, you will be able to access the Web Client directly on your laptops.

NCDC13 Original Images now available!

The four provided images are now available for download. Keep in mind these images have vulnerabilities and should not be run in sensitive environments!

NCDC13_Web | NCDC13_Shell | NCDC13_Exchange | NCDC13_DC

These files are also mirrored here.

The VMs can be run using the free VMware Player or the non-free VMware Workstation, which may be provided by your academic institution. If you’d like to run these on a local ESXi server instead, grab VMware vCenter Converter Standalone to convert them to the correct format. (You’ll need to register a free account with VMware to download ESXi and vCenter Converter).

CDC IRC Chat

Hello everyone!

After the NCDC this weekend, we decided it would be nice to have a place to congregate and have informal discussion about the event, and about future events.  We have started a channel on IRC at freenode.  Details below:

Server:  irc.freenode.net
Channel:  #isucdc
Password: (currently no password)

Hop on and give your praises, express your concerns, and suggest improvements!

VM Disk Size

There has been many questions about the 20GB disk size regulation.  Here is how it is stated currently:

“When creating a virtual hard drive, you are required to use the “Thin Provision” option and to make the drive no larger than 20GB in size. Your total disk usage must remain under 160GB.”
We have decided to change it.  The important part is the 160GB limit as well as the thin provisioning. Here is the revised sentence:
“When creating a virtual hard drive, you are required to use the “Thin Provision” option. Your total diskusage for all VMs must remain under 160GB.”